6. API
Time for reading the GiggleBot modules’ API.

6.1. GiggleBot - Regular Module
The gigglebot module should be the go-to module when playing around with the GiggleBot.
That’s why this is the first module that gets documented in this chapter.
The module, should you want to use it in another firmware instead of using the GiggleBot MicroPython Firmware (that already comes with all the modules in it), can be downloaded from here (version v0.4.0).
-
gigglebot.LEFT= 0¶ Left, either a left turn, or the left motor.
-
gigglebot.RIGHT= 1¶ Right, either a right turn, or the right motor.
-
gigglebot.BOTH= 2¶ Indicates both motors.
-
gigglebot.FORWARD= 1¶ Forward direction if the motor power is positive. Please note that if the motor power is negative, this forward would become a backward.
-
gigglebot.BACKWARD= -1¶ Backward direction if the motor power is positive. Please note that if the motor power is negative, this backward would become a forward.
-
gigglebot.motor_power_left= 50¶ Power to the left motor. From -100 to 100. Negative numbers will end up reversing the movement. Default value is 50%.
-
gigglebot.motor_power_right= 50¶ Power to the right motor. From -100 to 100. Negative numbers will end up reversing the movement. Default value is 50%.
-
gigglebot.neopixelstrip= None¶ Neopixel variable to control all neopixels. There are 9 neopixels on the Gigglebot. Pixel 0 is the right eye, pixel 1 is the left eye. Pixel 2 is the first of the rainbow pixel, on the right side. In order to control the neopixels, you must call
init()beforehand.
-
gigglebot.LINE_SENSOR= 5¶ I2C command to read the line sensors.
-
gigglebot.LIGHT_SENSOR= 6¶ I2C command to read the light sensors.
-
gigglebot.init()¶ Loads up the neopixel library and sets up the neopixelstrip variable for later use.
Important
It is possible to use the Gigglebot without calling this method but the leds will not work. Should you need more RAM space, you can choose to ignore the neopixels.
Returns: The neopixel strip.
-
gigglebot.set_smile(R=25, G=0, B=0)¶ Controls the color of the smile neopixels, all together.
Parameters: - R = 25 (int) – Red component of the color, from 0 to 255.
- G = 0 (int) – Green component of the color, from 0 to 255.
- B = 0 (int) – Blue component of the color, from 0 to 255.
-
gigglebot.set_eyes(which=2, R=0, G=0, B=10)¶ Controls the color of the two eyes, each one individually or both together.
Parameters:
-
gigglebot.set_eye_color_on_start()¶ Sets the eye color to blue if the batteries are good, to red if the batteries are running low.
This is called by the
init(), usually at the start of the program. You are free to call this method whenever you want if you need to keep a closer watch on the voltage level.
-
gigglebot.pixels_off()¶ Turns all neopixels off, both eyes and smile.
-
gigglebot.drive(dir=1, milliseconds=-1)¶ This results in the Gigglebot driving
FORWARDorBACKWARD.The following snippet of code will see the gigglebot drive forward for a second:
from gigglebot import *
drive(FORWARD, 1000)
And this snippet of code will do the same thing:
import gigglebot
gigglebot.drive(gigglebot.FORWARD, 1000)
Parameters: - dir = FORWARD (int) – Possible values are
FORWARD(1) orBACKWARD(-1). Please note there are no tests done on this value. One could theoretically use 2 to double the speed. - milliseconds = -1 (int) – If this parameter is omitted, or a negative value is supplied, the robot will keep on going until told to do something else, like turning or stopping. If a positive value is supplied, the robot will drive for that quantity of milliseconds.
- dir = FORWARD (int) – Possible values are
-
gigglebot.turn(dir=0, milliseconds=-1)¶ Will get the gigglebot to turn left or right by temporarily removing power to one wheel.
Parameters: - dir=LEFT (int) – Either
LEFT(0) orRIGHT(1) to determine the direction of the turn. - milliseconds=-1 (int) – If this parameter is omitted, or a negative value is supplied, the robot will keep on going until told to do something else, like turning or stopping. If a positive value is supplied, the robot will drive for that quantity of milliseconds.
- dir=LEFT (int) – Either
-
gigglebot.stop()¶ Stops the GiggleBot right away.
-
gigglebot.set_speed(power_left, power_right)¶ Assigns left and right motor powers. If both are the same speed, the GiggleBot will go mostly straight.
Note
It is possible that the GiggleBot does not go straight by default. If so, you need to adjust the speed of each motor to correct the course of the robot.
-
gigglebot.set_servo(which=0, degrees=90)¶ Parameters: Note
Moving the servo is not instantaneous. It is possible that you will need to give it time to reach its final position.
The following is an example that will get the servo moving from 0 to 180 degrees every second.
from microbit import *
from gigglebot import *

while True:
    set_servo(BOTH, 0)
    sleep(1000) # sleeps for 1000 milliseconds
    set_servo(BOTH, 180)
    sleep(1000) # sleeps for 1000 milliseconds
-
gigglebot.servo_off(which)¶ Removes power from the servo.
Parameters: which (int) – Determines which servo, LEFT(0),RIGHT(1),BOTH(2).
-
gigglebot.read_sensor(which_sensor, which_side)¶ Reads the GiggleBot onboard sensors, light or line sensors.
Parameters: - which_sensor (int) – Reads the light sensors
LIGHT_SENSOR(6), or the line sensorsLINE_SENSOR(5). Values are from 0 to 1023. - which_side (int) – Reads
LEFT(0),RIGHT(1), orBOTH(2) sensors. When reading both sensors, an array will be returned.
Returns: Either an integer or an array of integers (right, then left).
You can read the sensors this way:
right, left = read_sensor(LIGHT_SENSOR, BOTH)
- which_sensor (int) – Reads the light sensors
-
gigglebot.read_distance_sensor()¶ Read the detected range by the distance sensor. Uses the
read_range_single()method.Returns: The distance to the object as measured in millimeters. Range is up to 2.3 meters.
Return type: int
Raises: - OSError – When there’s trouble reaching the sensor.
- ImportError – If this module is run from a firmware that doesn’t have the
distance_sensormodule.
-
gigglebot.read_thp_sensor()¶ Read the temperature, the atmospheric pressure, humidity and dewpoint temperature. Uses the
TempHumPressclass to do that.Returns: In this specific order: temp in Celsius, temp in Fahrenheit, pressure in Pascals unit, humidity as percentage, dewpoint in Celsius, dewpoint in Fahrenheit.
Return type: 6-element float tuple
Raises: - OSError – When there’s trouble reaching the sensor.
- ImportError – If this module is run from a firmware that doesn’t have the
thpmodule.
-
gigglebot.read_light_color_sensor()¶ Detect the color with the Light and Color sensor. Uses the
get_color()method.Returns: Return type: tuple(string, tuple(int,int,int))
Raises: - OSError – When there’s trouble reaching the sensor.
- ImportError – If this module is run from a firmware that doesn’t have the
lightcolormodule.
-
gigglebot.volt()¶ Returns the voltage level of the batteries.
Returns: Voltage level of the batteries.
6.2. Distance Sensor
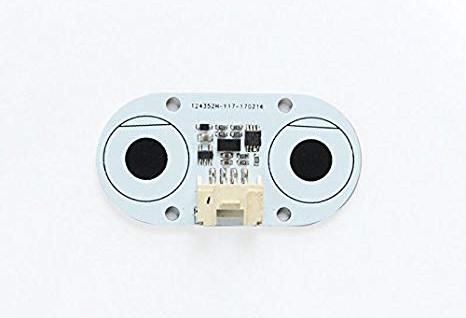
As you can see here, the Distance Sensor is the same sensor used on the GoPiGo3 and on any DexterIndustries board that we support and that has a Grove port with an I2C interface on it.
Because of this, we’ve spend lots of time trying to make the following API of the Distance Sensor identical to the one in the DI-Sensors documentation di_sensors.distance_sensor.DistanceSensor,
so that the transition from either platform can be as seamless as possible.
The module, should you want to use it in another firmware instead of using the GiggleBot MicroPython Firmware (that already comes with all the modules in it), can be downloaded from here (version v0.4.0).
-
class
distance_sensor.DistanceSensor(address=42, timeout=500)¶ Class for interfacing with the Distance Sensor.
-
__init__(address=42, timeout=500)¶ Constructor for initializing a
DistanceSensorobject.Parameters: - address = 0x2A (int) – Address of the Distance Sensor. Default address of the device is 0x29.
- timeout = 500 (int) – Timeout value for when
read_range_continuous()is used.
Important
When instantiating this object, keep in mind that the Distance Sensor has by-default, the same address as the
LightColorSensor, but gets changed immediately after that, right within the constructor.What still has to be done is to make sure the distance sensor is the first sensor to be connected and initialiazed and only after that the Light and Color Sensor can be plugged in and initialized too on the GiggleBot.
-
start_continuous(period_ms=0)¶ Start taking continuous measurements.
Once this method is called, then the
read_range_continuous()method should be called periodically, depending on the value that was set toperiod_msparameter.Parameters: period_ms = 0 (int) – The time between measurements. Can be set to anywhere between 20 ms and 5 secs. Raises: OSError – When it cannot communicate with the device. The advantage of this method over the simple
read_range_single()method is that this method allows for faster reads. Therefore, this method should be used by those that want maximum performance from the sensor.Also, the greater the value set to
period_ms, the higher is the accuracy of the distance sensor.
-
read_range_continuous()¶ Read the detected range while the sensor is taking continuous measurements at the set rate.
Returns: The detected range of the sensor as measured in millimeters. The range can go up to 2.3 meters. Return type: int Raises: OSError – When the distance sensor is not reachable or when the start_continuous()hasn’t been called before. This exception gets raised also when the user is trying to poll data faster than how it was initially set with thestart_continuous()method.Important
If this method is called in a shorter timeframe than the period that was set through
start_continuous(), anOSErrorexception is thrown.There’s also a timeout on this method that’s set to 0.5 secs. Having this timeout set to 0.5 secs means that the
OSErrorgets thrown when theperiod_msparameter of thestart_continuous()method is bigger than 500 ms.
-
read_range_single()¶ Read the detected range with a single measurement. This is less precise/fast than its counterpart
read_range_continuous(), but it’s easier to use.Returns: The detected range of the sensor as measured in millimeters. The range can go up to 2.3 meters. Return type: int Raises: OSError – When the distance sensor is not reachable.
-
timeout_occurred()¶ Checks if a timeout has occurred on the
read_range_continuous()method.Returns: Whether a timeout has occurred or not. Return type: bool
-
6.3. Temperature Humidity Pressure Sensor
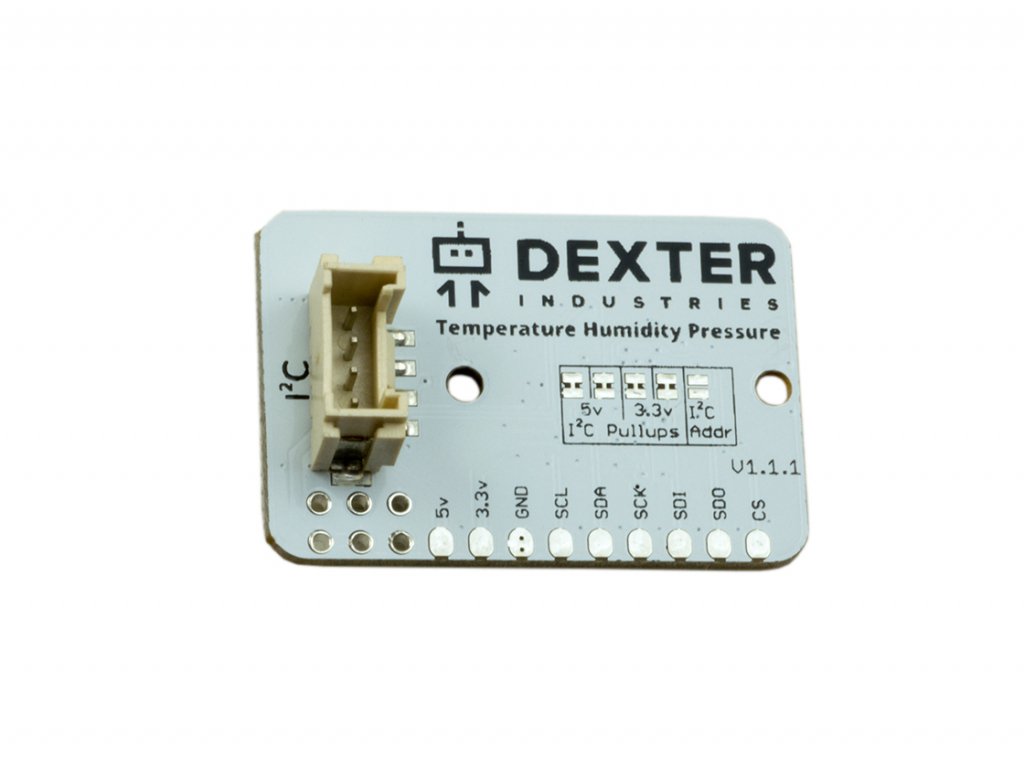
Just like with the Distance Sensor, the Temperature Humidity Pressure Sensor is the same sensor used on the GoPiGo3 and on any other board that we support.
As a consequence, we tried making the API of the Temperature Humidity Pressure Sensor similar to the one in the DI-Sensors documentation
di_sensors.temp_hum_press.TempHumPress, so that the transition from either platform can be as seamless as possible.
The module, should you want to use it in another firmware instead of using the GiggleBot MicroPython Firmware (that already comes with all the modules in it), can be downloaded from here (version v0.4.0).
-
class
thp.TempHumPress¶ Class for interfacing with the Temperature Humidity Pressure Sensor.
-
__init__()¶ Constructor for initializing link with the Temperature Humidity Pressure Sensor.
Raises: OSError – When the sensor cannot be reached.
-
get_temperature_celsius()¶ Read temperature in Celsius degrees.
Returns: Temperature in Celsius degrees. Return type: float Raises: OSError – When the sensor cannot be reached.
-
get_temperature_fahrenheit()¶ Read temperature in Fahrenheit degrees.
Returns: Temperature in Fahrenheit degrees. Return type: float Raises: OSError – When the sensor cannot be reached.
-
get_pressure()¶ Read the air pressure in pascals.
Returns: The air pressure in pascals. Return type: float Raises: OSError – When the sensor cannot be reached. Note
get_temperature_celsius()orget_temperature_fahrenheit()has to be called in order to update the temperature compensation.
-
get_humidity()¶ Read the relative humidity as a percentage.
Returns: Percentage of the relative humidity. Return type: float Raises: OSError – When the sensor cannot be reached. Note
get_temperature_celsius()orget_temperature_fahrenheit()has to be called in order to update the temperature compensation.
-
get_dewpoint_celsius()¶ Read dewpoint temperature in Celsius degrees.
The dewpoint represents the atmospheric temperature (varying according to pressure and humidity) below which water droplets begin to condense and dew can form.
Returns: Dewpoint temperature in Celsius degrees. Return type: float Raises: OSError – When the sensor cannot be reached.
-
get_dewpoint_fahrenheit()¶ Read dewpoint temperature in Fahrenheit degrees.
It does the exact same thing as
get_dewpoint_celsius(), the only difference being the used unit of measure.Returns: Dewpoint temperature in Fahrenheit degrees degrees. Return type: float Raises: OSError – When the sensor cannot be reached.
-
get_pressure_inches()¶ Read pressure in inches of Hg.
Returns: The air pressure in inches of Hg. Return type: float Raises: OSError – When the sensor cannot be reached. Note
get_temperature_celsius()orget_temperature_fahrenheit()has to be called in order to update the temperature compensation.
-
6.4. Light and Color Sensor
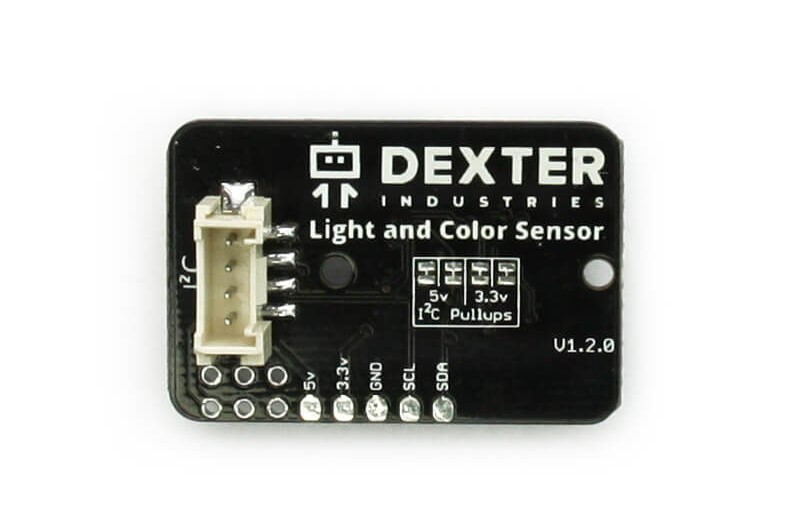
The module, should you want to use it in another firmware instead of using the GiggleBot MicroPython Firmware (that already comes with all the modules in it), can be downloaded from here (version v0.4.0).
-
class
lightcolor.LightColorSensor(integration_time=0.0048, gain=2)¶ Class for interfacing with the Light and Color Sensor.
-
__init__(integration_time=0.0048, gain=2)¶ Constructor to initialize the Light and Color Sensor.
Parameters: - integration_time = 0.0024 (float) – Time in seconds for each sample. 0.0024 second (2.4*ms*) increments. Clipped to the range of 0.0024 to 0.6144 seconds.
- gain = GAIN_16X (int) – The gain constant. Valid values are
lightcolor.GAIN_1X,lightcolor.GAIN_4X,lightcolor.GAIN_16Xandlightcolor.GAIN_60X.
Raises: OSError – When the sensor cannot be reached.
-
set_led(value, delay=True)¶ Turn on/off the LED on the Light and Color Sensor.
Parameters: - value (bool) –
Truefor turning it on orFalseotherwise. - delay = True (bool) – Whether to wait for that much as it takes to take a reading before actually reading the sensor.
Raises: OSError – When the sensor cannot be reached.
For things that emit light like monitors, the LED should be turned off, but for anything else it is recommended to have it turned on.
- value (bool) –
-
get_color()¶ Read the sensor and determine which color it resembles the most from the
known_colorslist.This method is based off of
guess_color_hsv()function.Returns: The detected color in string format and then a 3-element tuple describing the color in RGB format. The values of the RGB tuple are between 0 and 255. Return type: tuple(str,(float,float,float)) Raises: OSError – When the sensor cannot be reached.
-
get_raw_data(delay=True)¶ Read the RGBA values from the sensor.
Parameters: delay = True (bool) – Whether to add delay before actually reading the sensor or not. The delay is equal to length of time it takes to take a reading. Returns: The RGBA values as a 4-tuple on a scale of 0-1. Return type: tuple(float,float,float,float) Raises: OSError – When the sensor cannot be reached.
-
-
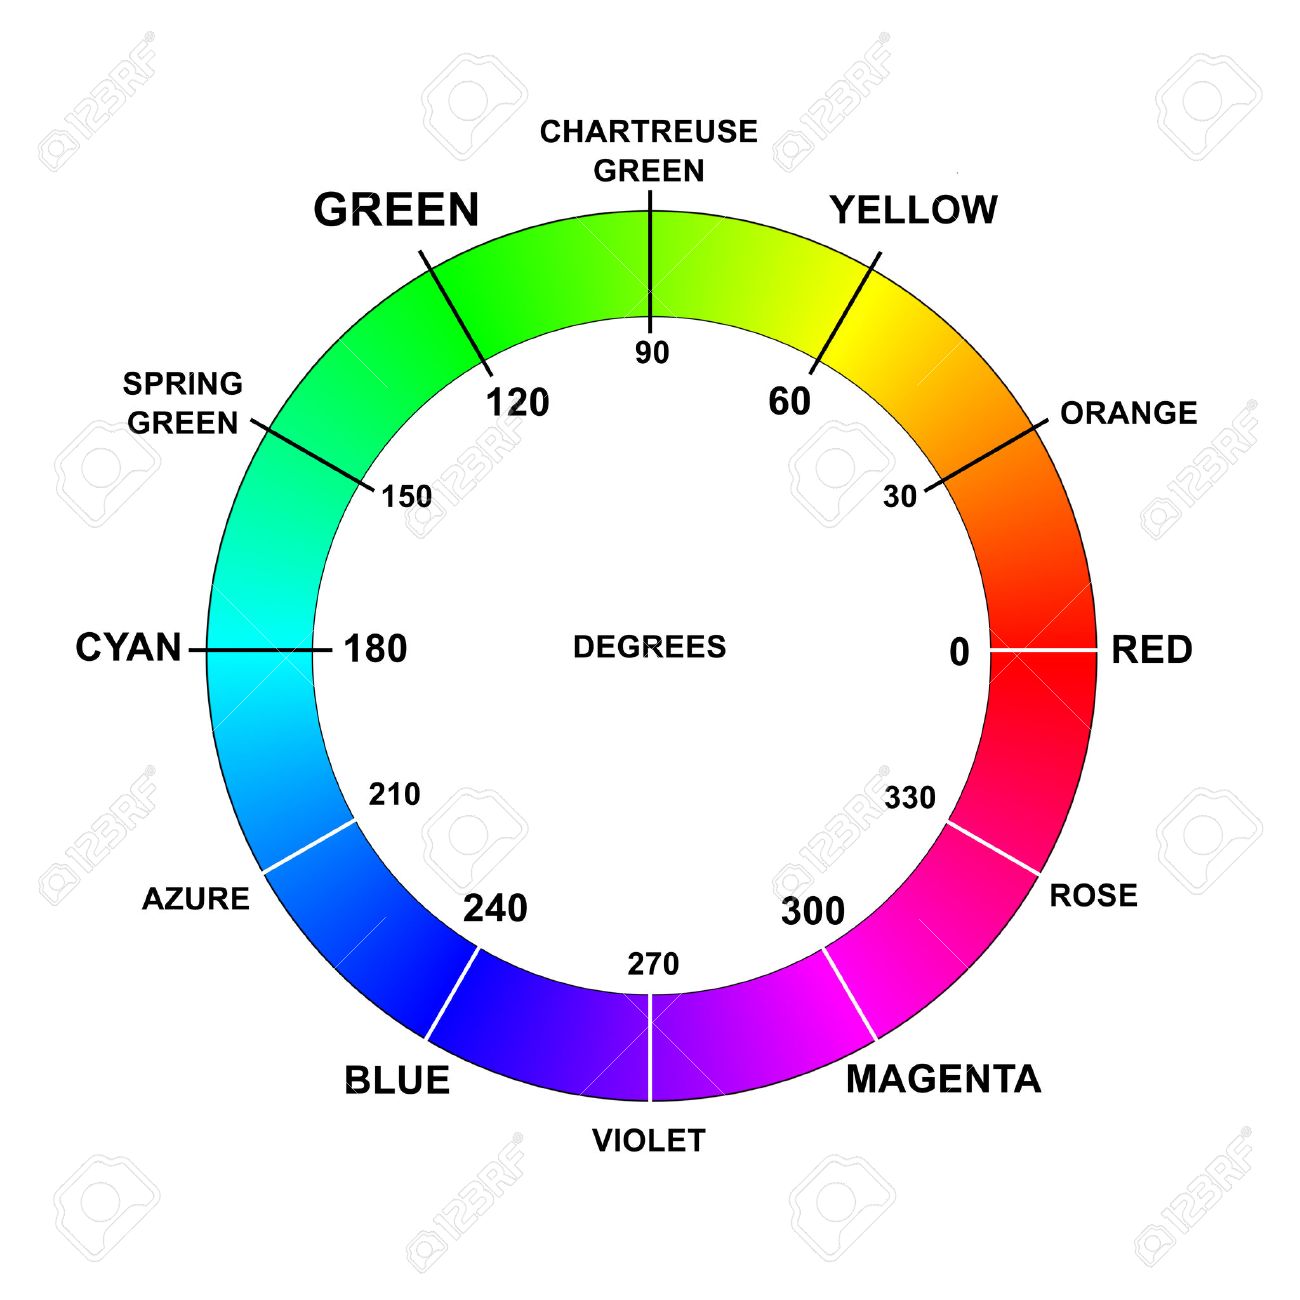
lightcolor.known_colors= {'azure': (0, 128, 255), 'blue': (0, 0, 255), 'chartreuse-green': (128, 255, 0), 'cyan': (0, 255, 255), 'green': (0, 255, 0), 'magenta': (255, 0, 255), 'orange': (255, 128, 0), 'red': (255, 0, 0), 'rose': (255, 0, 127), 'spring-green': (0, 255, 128), 'violet': (127, 0, 255), 'yellow': (255, 255, 0)}¶ 12 predefined colors in RGB format that the
LightColorSensorclass andguess_color_hsv()function use to detect colors.
-
lightcolor.known_hsv= {'azure': [(195, 65, 40), (222, 100, 100)], 'blue': [(223, 65, 40), (256, 100, 100)], 'chartreuse-green': [(77, 65, 40), (105, 100, 100)], 'cyan': [(167, 65, 40), (194, 100, 100)], 'green': [(106, 65, 40), (136, 100, 100)], 'magenta': [(288, 65, 40), (316, 100, 100)], 'orange': [(18, 65, 40), (47, 100, 100)], 'red': [(-13, 65, 40), (17, 100, 100)], 'rose': [(317, 65, 40), (346, 100, 100)], 'spring-green': [(137, 65, 40), (166, 100, 100)], 'violet': [(257, 65, 40), (286, 100, 100)], 'yellow': [(48, 65, 40), (76, 100, 100)]}¶ The same 12 predefined colors in
known_colors, but in HSV format. Used byLightColorSensorclass andguess_color_hsv()function to detect colors.
The above colors were picked from the following color wheel - there are a total of 12 colors hand-picked.
All the codenames for these colors are to be found as keys in known_colors and known_hsv dictionaries.
In the following context, the numbers encompassing the wheel represent the Hue of the color. You can go on and read more about Hue and other characteristics of HSV format here.
Note
If you want to come up with your own colour boundaries, check this thread here.
-
lightcolor.translate_to_hsv(in_color)¶ Standard algorithm to switch from one color system (RGB) to another (HSV).
Parameters: in_color (tuple(float,float,float)) – The RGB tuple list that gets translated to HSV system. The values of each element of the tuple is between 0 and 1. Returns: The translated HSV tuple list. Returned values are H(0-360), S(0-100), V(0-100). Return type: tuple(int, int, int) Important
For finding out the differences between RGB (Red, Green, Blue) color scheme and HSV (Hue, Saturation, Value) please check out this link.
-
lightcolor.guess_color_hsv(in_color)¶ Determines which color
in_colorparameter is closest to in theknown_colorslist.This function converts the RGBA input into an HSV representation and then it determines within which color boundary described in
known_hsvdictionary it fits in. Afterwards, it returns the candidate color in both text and RGB formats.Parameters: in_color (tuple(float,float,float,float)) – A 4-element tuple list for the Red, Green, Blue and Alpha channels. The elements are all valued between 0 and 1. Returns: The detected color in string format and then a 3-element tuple describing the color in RGB format. The values of the RGB tuple are between 0 and 255. Return type: tuple(str,(float,float,float)) Important
For finding out the differences between RGB (Red, Green, Blue) color scheme and HSV (Hue, Saturation, Value) please check out this link.
6.5. GiggleBot - Diagnostic Module
The module, should you want to use it in another firmware instead of using the GiggleBot MicroPython Firmware (that already comes with all the modules in it), can be downloaded from here (version v0.4.0).
-
gb_diag.MOTOR_RIGHT= b'\x01'¶ Left motor constant.
-
gb_diag.MOTOR_LEFT= b'\x02'¶ Right motor constant.
-
class
gb_diag.GiggleBot¶ Class to get details and check the status of the GiggleBot hardware.
-
get_details()¶ Gets details about the Gigglebot robot.
Returns: The manufacturer name of the board, the name of the board and the firmware version of it in this specific order. Return type: tuple(string, string, int)
-
get_voltages()¶ Gets battery and rail voltages.
If the power switch is off, the value returned for the battery voltage is unequivocally close to 0.
Returns: The battery and rail voltages in this order. Return type: (float, float)
-
set_motor_power(port, power)¶ Sets the power of a single motor on the GiggleBot.
Parameters: - port – Either
MOTOR_LEFTorMOTOR_RIGHTdepending on which motor has to be controlled. - power (int) – -100 to 0 for reverse and from 0 to 100 for full speed ahead.
- port – Either
-
set_motor_powers(powerLeft, powerRight)¶ Sets the power of both motors of the GiggleBot.
Parameters: - powerLeft (int) – Anywhere between from -100 to 100 for the left motor.
- powerRight (int) – Anywhere between from -100 to 100 for the right motor.
-
get_motor_status(port)¶ Returns a report of the status of a given motor on the GiggleBot.
Parameters: port – Either MOTOR_LEFTorMOTOR_RIGHT.This method returns a 2-element list where the 1st element is called the
status_flagand the 2nd one is represents the current speed set for the given motor.The
status_flagcan have the following values:- For 0 it means the conditions are normal (the motor can run).
- For 1 it means the battery voltage is too low or the power switch is off.
Also, if the battery voltage is <= 3.3V, then it’s too low and the motors float. If the battery voltage is >= 3.4V, then it’s high enought that the motors are set to run. This difference of 0.1V is introduced in order to prevent the motors from quickly turning on and off if the battery voltage is right on the edge.
Returns: A 2-element list containing the status of the motor and the current speed/power of it. Return type: list(int,int)
-
reset_all()¶ Brings the GiggleBot to a full stop, while also cutting power to the motors, so that the battery life is preserved.
-